
Separate the temperatures you are working with.
The thermal process window is the range of conditions in which your layers bond well and the printed part still holds its shape. Understanding four temperatures helps explain why an extruder setting alone cannot define that window.
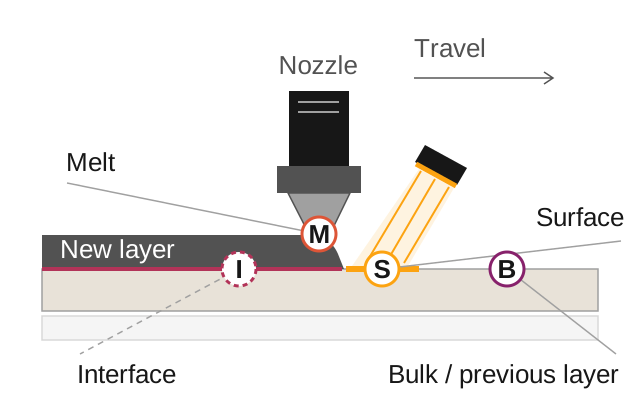
- Melt temperature
- You control it through the extruder settings. It describes the hot material arriving at the next bond.
- Bulk / previous layer temperature
- Layer time, wall thickness, melt temperature and ambient conditions all affect it. LEAM controls this temperature through cooling and changes in motion speed.
- Surface temperature
- LEAM adds control here: in the thin film heated just before deposition. The surface can reach the temperature needed for bonding while the bulk below stays stable.
- Interface temperature
- This is the temperature where the fresh bead meets the heated surface, and it determines bonding. It results from those two temperatures. Controlling the surface makes the bonding condition repeatable.
Give bonding and stability their own control.
The bonding surface can need a higher temperature than the bulk beneath it. LEAM heats a thin surface film to reach the temperature needed for bonding, while cooling and changes in motion speed keep the bulk stable.
This gives you more freedom to choose a geometry and layer time around the part’s use. Larger tools and longer paths become possible, and a planned pause can make room for machining, inserts, wiring or inspection.
See how cooling changes the time on the printer
Define a useful window for your part.
Start with the requirements that must be met: a specific material, target strength, minimum throughput or maximum wall thickness. Then establish settings that achieve those requirements together.
The material’s response to light matters too. Darker materials heat more readily; lighter colors respond less strongly. Fully transparent or perfectly white materials cannot be heated with our system. See the material and color FAQ when choosing a compound.